
PS Tutorial #2 - Fake a HDR image
I got my friend's request few days ago about how to turn a normal image to an HDR image without using a high defination camera. Well, I never tried before, but then I googled around and found a tutorial which exactly answered my friend's question.
First of all, thanks for the great tutorial from: http://www.nill.cz/index.php?set=tu1
And here is what I did with little bit of modification. Coz the method I used is slightly different with his tutorial, it depends on how your image look like.
First of all, thanks for the great tutorial from: http://www.nill.cz/index.php?set=tu1
And here is what I did with little bit of modification. Coz the method I used is slightly different with his tutorial, it depends on how your image look like.

1) I simplified some steps, because it works pretty much the same like that tutorial. Now we got a pretty girl fighter picture like this.

Straight go Image > Adjustment > Levels

 |
| Move the left and right arrows inward a little bit to gain a greater contrast. |
2) Duplicate the Background layer, name it Color Dodge, go to the Blending Mode above, choose Color Dodge. Now the exposure gone crazy, but don't worry, we'll adjust it later.

3) Duplicate the Color Dodge layer, name it Linear Burn, and go Blending Mode again, choose Linear Burn. Now the image seems make more sense.


We are still on the Linear Burn layer, now set the foreground color as Black.

Then go Select > Color Range

Set the Fuzziness around 100
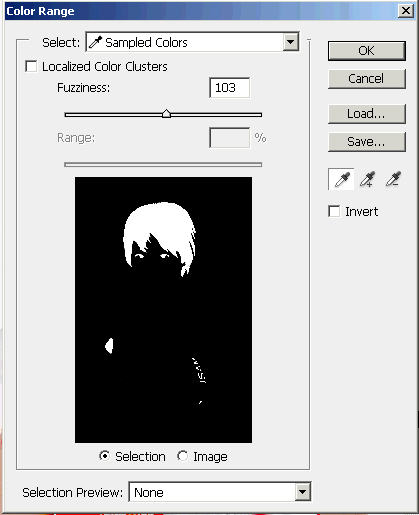
Now you should see the color range function is generated a selected area, at the bottom of the layer palette, choose Apply Mask (you see where my cursor pointing at)

4) Duplicate the Linear Burn layer, rename it as "Overlay", yes, change the Blending Mode to Overlay. Then, hold the Alt key on your keyboard, click on the Mask on this layer, you will switch to the Mask view (only black and white), press Ctrl + I (Invert) to invert the black and white.

5) This time, duplicate the very first layer (Background Layer or whatever you called it at the beginning), go to the Blending Mode, choose Multiply
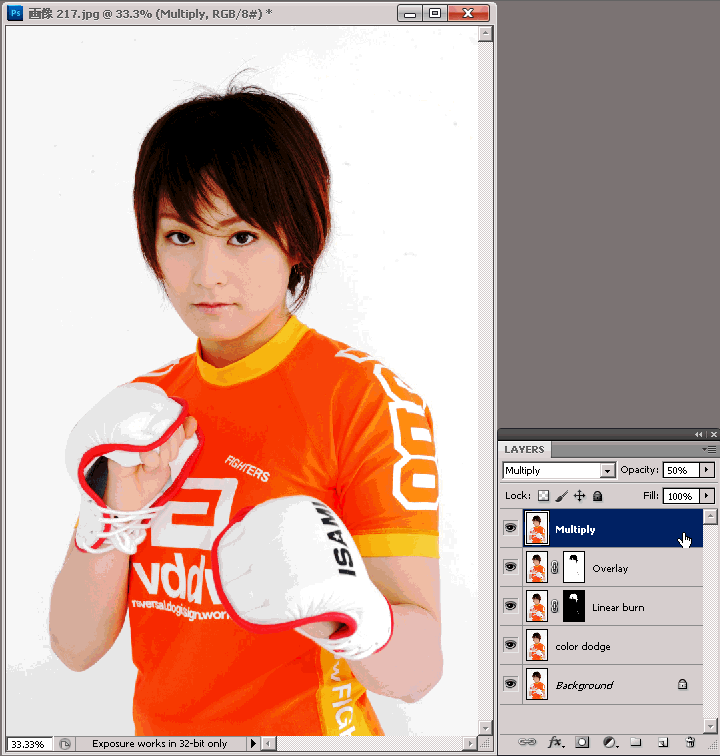
6) We are almost done now. Except the Background layer (the lowest layer), adjust all the opacity of all the other layer until you get the best result. In this example, I set them all to 50%, but 20% on the Linear Layer.
END - That's it! To be honestly, I don't see this is very HDR but just greater color contrast, maybe the result will be more obvious with a landscape picture rather than a plain background portrait. But at least it looks a lot sharper than the original.
Play around the value of every setting will make this tutorial works better.
PS Tutorial #1 - Cropping hairy object
Most PS users know Pen tool and Lasso to do cropping, but sometime those tools just not enough to handle some irregular shapes, especially hair and fur. I bet some of you had been encounter this kinda problem, me too.
7 years ago, I read a magazine and found a tutorial about the Channels palette in PS, then I found out this amazing skill to solve the hair-cropping problem. OK, let's start it!

1) You need a picture with a plain background, this is the key point that makes the whole thing easier and better.

2) Open "Channels"

3) There is 4 channels, Red, Green and Blue combined became RGB, check them out to see which channel has the strongest contrast between the object and background, in this example, seems Blue channel has the strongest contrast.


4) Right-click channel "Blue", choose "Duplicate channel", now we got an extra channel "Blue copy".

5) Let's work on the "Blue copy" channel now, the most important steps now begin. Go "Image" > "Levels".
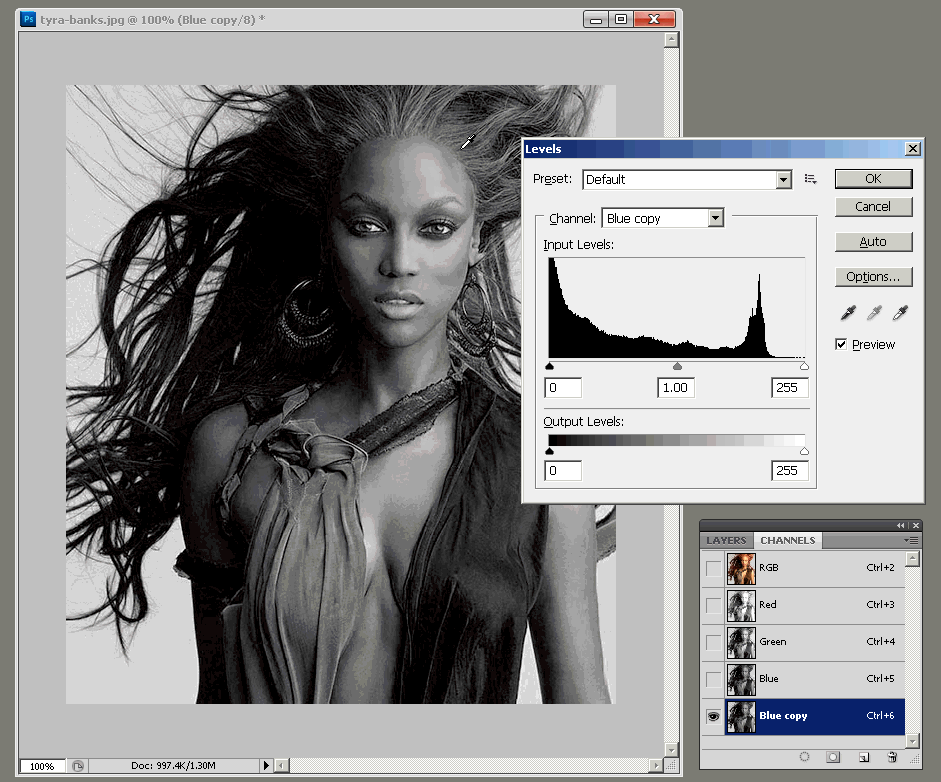
6) Adjust the levels to get the contrast goes even stronger. What I'm trying to do now is lighten up the background as white as possible, and make the object as dark as possible.

7) Now this is what I want. But not finish yet.
8) There is still some light on Tyra's face and body, I want them turn black as well, so I use "Brush" to paint them black. You can use other tool like "Lasso" to do the same thing.

9) Until you get something like this. Now I get the silhouette of Tyra.

10) Now go "Image" > "Adjustments" > "Invert". I want the background in black and object in white. This step is optional but I like to do it first.

11) Yeah, almost done.

12) Now we come back to RGB channel

13) Go "Select" > "Load Selection..."
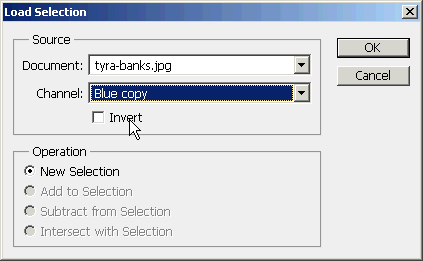
14) In the "Load Selection" palette, in "Channel", choose the channel which we worked on, in this example, which is "Blue copy" channel. In step #10, I said it's optional to invert the channel, because even if you didn't, you can still click the "Invert" check box here to do the same effect.

15) Now you see Tyra is in selection mode.

16) Press "Ctrl + J" to duplicate the selection into a new layer. Now the whole thing is done, time to see how it looks.

END - I inserted a dark background image placed under the object layer. It's still not perfectly cropped but I'm just too lazy to adjust the "Levels", if you spend time to play around the "Levels" until you got the best black and white contrast, you can get even better result than this example. The principle of this tutorial is separating the object and background by "black & white" contrast. If you got any better idea than this tutorial, please post it up in my blog! Thank you for watching!